
In this article we will look at 5 simple steps to improve your lubrication program. But firstly what is lubrication, what is good lubrication and what is the cost of not doing it right?
First let’s look at the definition:
Lubrication is the process or technique employed to reduce friction between, and wear of one or both, surfaces in proximity and moving relative to each other, by interposing a substance called a lubricant in between them.
Reliability of machinery is largely dependent on the performance of lubricants, which in turn is depends on:
- Lubricant selection
- Lubricant quantity
- Lubricant cleanliness
- Lubricant application
Common causes of Machine failures relating to poor lubrication practices include:
- Using the wrong type of lubricant
- Using too little lubricant
- Using too much lubricant
- Mixing of lubricants
- Contamination of lubricants by foreign objects or water
- Exposure of lubricants to excessive heat or cold
Cost of poor lubrication practices
Lubrication has a major impact on the reliability and life of equipment and the subsequent cost of maintenance and operational uptime. Lubrication accounts for a very small portion of the maintenance budget, yet there is considerable industry evidence to suggest a high percentage of rotating equipment failures are attributable to poor lubricant management. Some examples are:
- Findings from a recent hydrocarbon audit we conducted at a copper mining and processing facility revealed machinery lubrication systems were the fourth largest contributor of downtime in the plant.
- According to a major ball bearing company, 54 percent of bearing failures are lubrication-related.
- In a study conducted by a top technology institute, it was estimated approximately $240 billion is lost annually (across U.S. industries) due to downtime and repairs to manufacturing equipment damaged by poor lubrication.
54% of bearing failures are lubrication-related
Clearly there are significant costs resulting from poor lubrication practices. So, how could you optimise your lubrication program?
Optimising your lubrication program
We recommend the 5 step roadmap below for optimising your lubrication program.
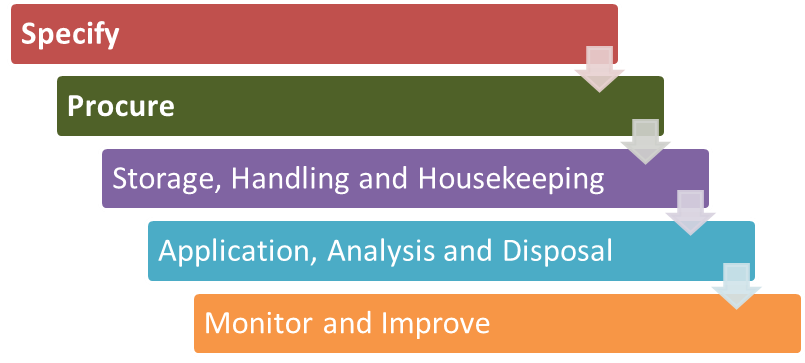
Step 1: Specify
Start by establishing minimum requirements. Conduct a comprehensive lubrication survey to collect the information which will then determine the strategy behind lubricant selection, purchasing, storage, dispensing and application.
This information should be made readily available in the form of a database containing a list of all equipment and which lubricants should be used along with the quantity required, frequency of application, application method etc. Such a tool will allow you to assess all the lubricants being used at your facility and determine if the number of different types or grades of lubricants can be minimised. It will also provide the opportunity to select lubricants that are available from the same supplier (if feasible). This database will require regular updates to ensure it is always accurate.
Very seldom does the maintainers get the opportunity to provide input to the design of new equipment or modifications but non the less consider the following aspects should still be considered during the design process:
- Reliability – e.g. required oil filtration levels and oil sealing, automatic vs manual lubrication
- Operability – e.g. remote monitoring and control of lubrication system performance
- Maintainability – e.g. allowance for lubricant health monitoring via field gauges, oil sampling points, easy access to lubricating points and other lubrication system related maintainable items.
Lubricant selection
Today’s machine components are designed to perform using a particular type of lubricant. Evidently, a general-purpose lubricant is not always suitable and spending a bit of time and effort into on selecting the right lubricant will likely save time and money in the future.
With so many variables, the selection process can be a tricky one and should be done through:
- Referring to the OEM recommendation.
- Seeking advice from an expert (often a lubricant supplier). Choosing the lubrication supplier is just as important as choosing the right lubricant.
Step 2: Procure
Once the lubrication requirements have been established, convert this information into generic lubricant purchase specifications. Aim to rationalise selected lubrication products to one supplier as far as practical. Ideally, this can be achieved by:
- Organising a representative from the chosen supplier to visit the site and make recommendations, or.
- Alternatively one could use equivalence charts (found in users manuals or available on the internet) to find suitable replacements for the OEM recommendations.
Note: Take care when using equivalence charts to ensure the substitute lubricant possesses all the required properties.
The benefits from standardisation are numerous and extend include:
- from saving on transport costs and
- reducing the risk of cross contamination, to and
- easing the management of procurement and storage of lubricants.
Step 3: Storage, handling and housekeeping
Poor storage and handling practices can cause products to deteriorate or become contaminated, which can reduce their effectiveness and create waste. In some cases this can lead to machinery damage and higher maintenance costs. Problems can arise due to:
- Container damage
- Water contamination from rain, seawater or condensation
- Dirty dispensing equipment
- Exposure to dust and dirt
- Mixing different brands or types of lubricant
- Exposure to excessive heat or cold
- Products exceeding their shelf life
Some elementary practises can be implemented at little to no cost to ensure these problems are minimised. Below are some of the good practices you should implement at your work place:
Storage
Follow the Lean 5S methodology for lubricants storage. The 5 S’s are:
- Sort
- Set in order
- Shine
- Standardise
- Sustain
- Use visual managing techniques such as labelling containers to avoid confusion, colour coding storage containers and lubrication lines.
- Where possible, store lubricants indoors to shield them from the weather.
- If lubricants must be stored outside, certain precautions can be taken to minimize the effects of the weather:
- Cover the lubricants with a plastic drop cloth.
- Placing the drums on blocks or racks raised above the ground will prevent moisture damage.
- Do not allow water to accumulate on top of drums.
- Store drums on their sides with the bungs approximately horizontal.
- Some lubricants deteriorate with age and a First In, First Out (FIFO) method of inventory control will eliminate the risk of deterioration over time.
- Drums and pails should only be moved using the correct lifting equipment to avoid container damage, drops and spills.
- Containers should only be filled in clean conditions.
Handling
- Pumps, funnels, oilcans, hoses, grease guns and other dispensing equipment should be kept clean and stored in a closed vented cabinet or covered when not in use.
- To avoid cross-contamination dispensing equipment should be dedicated to a grease type & labelled/tagged using a colour or shape code. Consider also adding a label or tag with the same colour or shape to the filling point on the equipment being lubricated, or install connection systems that physically prevent the incorrect dispenser being attached to the lubricant fill point.
- When adding oil to equipment, do so in a manner that will not add dirt to the system. Always clean the top of the reservoir and around the filler cap before removing the cap and ensure all fittings are free of dirt and moisture.
Housekeeping
- Remove contaminants such as water dirt and slurry that are in close proximity to lubrication systems and storage areas.
- Repair faulty connection points that could allow the direct ingress of contamination into the lubricant.
- Repair lubrication leaks.
- Ensure all inspection points for breathers, gauges and sight glasses are accessible and legible.
- Regularly check desiccant breathers are in working order. These remove contaminants from the lubrication system and will often change colour when they need replacing.
- Use grease cartridges for grease guns to prevent contamination.
- Educate the maintenance team on the importance of lubricant cleanliness.
Step 4: Application, analysis and disposal
When it comes to application of lubricants, reliability-centred practices should be employed wherever possible i.e.in order to ensure that the
- To apply the right volume of the right lubricant is added at the right frequency; and
- at the best or at least healthy intervals
For establishing the right volume we recommendation that you:
- Follow the OEM recommendations. However, the unique operating environment and usage may call for a unique lubricant procedure that differs from the manufacturer’s guidelines.
- For lubricating oil replenishment, use the oil reservoirs portal or some other method to judge the oil volume and hence the interval at which to refill the reservoir.
- For greasing, use a method for calculating the replenishment amount. Equations recommended by SKF and Kluber are commonly used. Use ultrasonic assisted greasing in conjunction with the above calculations for optimum frequency.
For determining the appropriate re-lubrication interval:
- Start with OEM recommendation and optimise interval by using condition monitoring techniques e.g.
- Vibration analysis
- Acoustic emission analysis
- Thermo-graphic analysis
- Oil and grease analysis
The other important factor effecting affecting application of lubricants is the maintenance work management system. Key recommendations for improvements in this area are:
- Ensure all lubrication tasks are captured in your Computerised Maintenance Management System (CMMS).
- Provide lubrication awareness training to your crew.
- Ensure lubrication tasks on maintenance service sheets are sequenced in routes.
- Place lubrication schedule wall charts throughout the workshop.
Analysis
Regular oil analysis will allow a cleanliness/contamination standard to be set and measured against. As well as testing the condition of the in-service oil, it could be worthwhile to analyse the oil upon arrival at site and just before it is applied to the system in order to provide an indication of the quality of storage and handling. Samples could also be taken before and after a filter to determine the effectiveness of the filter.
Some basic do’s and don’ts are frequently overlooked and could be an area for improvement:
- Do sample when the equipment is running. DO NOT sample “cold” systems.
- Do sample upstream of filters and downstream of machine components.
- Do not use dirty or used sampling equipment.
- Do ensure that samples are taken at proper intervals. These could be monthly, quarterly or after a certain number of operating hours. Having on-site oil analysis equipment allows the user to self-manage and extend intervals safely as trends develop.
- Do forward samples immediately to the oil analysis laboratory. DO NOT wait more than 24 hours to dispatch/analyse the samples.
Disposal
The best practise for the disposal of waste oil is to keep the used lubricant from ever being introduced into the environment. Before developing a disposal process, thoroughly research the current national and State legislation and requirements regarding waste removal and disposal (particularly environmental criteria). The following lists some practical areas to consider in the disposal process.
- Clearly label all waste containers to avoid confusion.
- The waste containers should be of adequate size to hold all of the oil in the system from which it is being drained.
- Minimise the number of transfers between containers and locations. The highest risk of spills is during the transfer process.
- Consider using vegetable based or biodegradable lubricants for equipment that does not require specialised lubricants.
- Installing portable filter carts eases the process of removing the oil.
- If large volumes of waste are to be stored for extended periods in a single location, it is advisable to have spill containment protocol in place.
- Recycling waste oils should be common practise.
Step 5: Monitor and improve
The objectives of this step are:
- To monitor the effectiveness of the optimised lubrication program. This can be done by conducting routine lubrication survey/audits.
- To identify and address any issues that may arise from this monitoring process.
Other important factor to consider here is the maintenance culture within your organisation. For your optimised lubrication program to work, it is important to promote a contamination control culture amongst the general workforce. Culture drives behaviour which in turn influences quality of work. Change the behaviour by appropriate use of performance measures and combining it with an effective performance management process and reward system. Strong leadership is essential as well to promote the culture.
Selling the value of optimising lubrication practices
We, as Maintenance Reliability professionals, are convinced of the benefits that improved lubrication practices can bring to an organisation. In order for your improvement proposition to resonate rationally, there are a few critical elements to consider.
- First, there must be a sound business case. The proposition must demonstrate real business value. This means that we need to be able to estimate and articulate the costs, benefits and risks associated with your proposition.
- Second, we must be able to communicate our business case clearly and concisely.
To learn more on this topic, read our article “Selling the Value of Reliability Improvement to Senior Management”.
Conclusion
I hope that this article has served as a useful resource for you to understanding lubrication basics and has provided some useful tips for improvements at your workplace. If you feel that you need help optimising your lubrication program, call us and talk to one of our expert consultants or email us today.
For future useful articles sign up to our mailing list now.